先说一下基本环境吧
1,Axis2:1.75
2,springMVC:4.2.2
下面开始整合吧,一共分为六步:
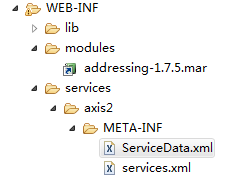
1,首先在我们的springMvc项目的WEB-INF下面创建文件夹 services,在services下创建任意文件夹,如我的axis2,再在axis2下面创建文件夹,再创建文件夹META-INF,再创建文件services.xml和ServiceData.xml
2,在WEB-INF下面创建文件夹modules,将axis2安装程序下同级目录,也就是modules下,将addressing-1.7.5拷贝进来
最后的目录路径如下所示

3,在我们的services.xml里面添加如下代码,其中Axis2ServiceImpl是我们的访问名,大家可以从下面(博文最后)的访问路径可以看出是什么意思,axis2ServiceImpl这个则是我们的SpringBean,示例代码在配置文件下面可以查看。
Axis2ServiceImplDescription org.apache.axis2.extensions.spring.receivers.SpringServletContextObjectSupplier axis2ServiceImpl
axis2实现类,实现类可不用接口,注意axis2ServiceImpl就是我们上面配置文件中的SpringBean
@Service("axis2ServiceImpl")
public class Axis2ServiceImpl implements Axis2Service{

	@Override
	public String ceshi(String name) {
		// TODO Auto-generated method stub
		return "fdsfdsfs::"+name;
	}

}
4,在我们的ServiceData.xml里面添加如下代码
5,在我们的application-context.xml添加如下代码,让我们的axis2由Spring来管理
6,在我们的web.xml里面添加如下代码
AxisServletorg.apache.axis2.transport.http.AxisServlet2AxisServlet/services/*
最后我们就可以通过如下网址访问我们的服务了
http://localhost:8080/eqUseStatus-portlet/services/Axis2ServiceImpl?wsdl
根据这个地址,大家可以对比下上面的配置,如Axis2ServiceImpl是我们的访问名。。。。
通过这样的接口方式
http://localhost:8080/eqUseStatus-portlet/services/Axis2ServiceImpl/ceshi?name=fewafdsf
就可以得到返回值了
需要注意的事项;
1,如果出现这个错误:
Caused by: org.apache.axis2.AxisFault: Spring context file cannot be located for AxisService
那是因为配置messageReceiver使用了老版本的配置方法,或者配置不正确
如老版本配置的 ServiceObjectSupplier可能是 org.apache.axis2.extensions.spring.receivers.SpringAppContextAwareObjectSupplier
2,如果出现这个错误:
The ServiceClass object does not implement the required method in the following form
那是因为您配置的messageReceiver错误,或者过时
比如我当前版本(环境)应该配置
http://www.w3.org/ns/wsdl/in-only
而不再是
http://www.w3.org/2004/08/wsdl/in-only
爆款云服务器s6 2核4G 低至0.46/天,具体规则查看活动详情